Optional Lesson: Cloud Libraries
This walk-through demonstrates how to create and manage libraries for cloud workspaces in OrCAD X Capture 25.1. This will allow for easy sharing of parts and libraries with team members for efficient collaboration. After you complete the topic, you will be able to:
- Create parts
- Add parts to your personal workspace
- Publish parts to the cloud workspace
- Place parts from the cloud workspace
To follow along, continue with the design from the last topic or use the provided design files.
 Open in New Window
Creating a Workspace Part
Step 1: Open the provided or continued design in OrCAD X Capture CIS.
Step 2: Select Place > Component from the menu.
Step 3: The Component Explorer tab opens. Select New Component to add a new component.
Step 4: The Component window opens. This example will model the diode after the NTE5800 rectifier diode. Enter NTE5800 for the Part Number and select Active from the Lifecycle dropdown.
Step 5: Select Diode from the Category dropdown. The Property tab is automatically populated with default values and the default symbol and footprint for the corresponding category.
Step 6: Select the uppermost checkbox to include all properties.
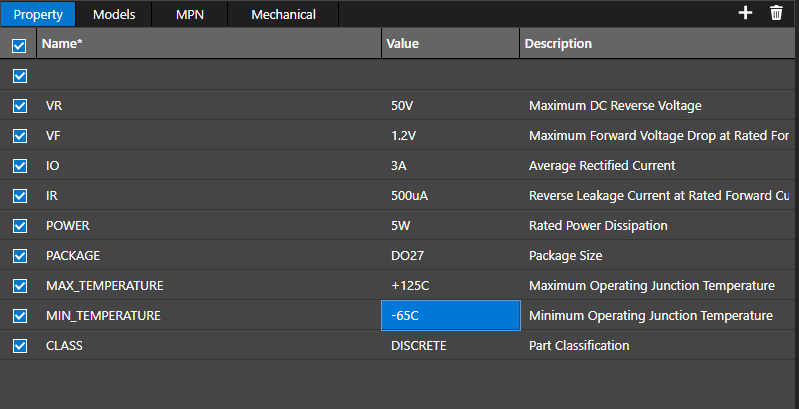
Step 7: Configure the following component values:
- VR: 50V
- VF: 1.2V
- IO: 3A
- IR: 500uA
- Power: 5W
- Max Temperature: +125C
- Min Temperature: -65C
Step 8: Click Save to save the component.
Step 9: Expand the My Workspace folder and select Diode. The NTE5800 is listed here with any previously created diodes.
Publishing a Workspace Part
Note: To create a shared workspace, advanced cloud capabilities are needed. Once a workspace is created, it can be shared with additional users who can participate and manage content in the workspace as needed, including publishing parts. If you do not see the ability to share workspaces and would like to, contact us here.

Step 10: Right-click the diode row and select Publish.
Step 11: The Publish Part window opens. Select Engineering as the target workspace. Select Major to publish the first revision as 1.0 and add any desired comments.
Note: If no Engineering workspace is listed, perform the steps in the Cloud Workspace Configuration lesson to create it.
Step 12: Check Delete from My Workspace to remove the part from the local workspace
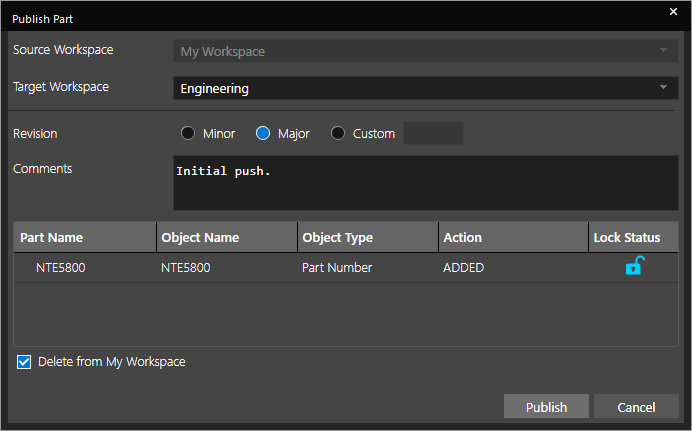
Step 13: Select Publish. The part is removed from your personal workspace and moved to the Engineering workspace.
Step 14: Select the Engineering workspace. NTE5800 is now listed as a part.
Note: For a locally hosted component database with additional functionality, an integrated new part introduction process, customizable user permissions, and more, upgrade to OrCAD CIP.
Placing a Workspace Part
Step 15: Select NTE5800 in the Engineering workspace. Right-click and select Place.
Step 16: Click to place the part in the schematic. Right-click and select End Mode.
Step 17: Right-click the diode and select Edit Properties.
Step 18: The Property Editor tab opens. The parameters assigned in the Component window are listed. Close the tab.
Step 19: A workspace part has been created and placed. This diode is not needed in the design, so select it on the canvas and press Delete on the keyboard.
Creating a New Component Category
Step 20: Return to the Component Explorer tab. To improve organization of your cloud-based component libraries, you can create additional categories in your workspaces. To create a new category, right-click My Workspace and select Add Category.
Step 21: The Category window opens. Enter MOSFET for the name and select Electrical for the Part Type.
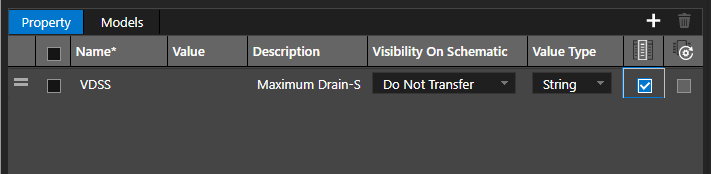
Step 22: In the Property table, you can define information that should be defined for any MOSFET added to your cloud library. Select the cell under Name and enter VDSS for the property name.
Step 23: Under Description, enter Maximum Drain-Source Voltage.
Step 24: Leave the options for Visibility On Schematic and Value Type as Do Not Transfer and String, respectively.
Step 25: Check the option for Show In Place Component. This will show the property in the Component Explorer tab.
Step 26: Select the plus sign above the table to add a property.
Step 27: Click and drag the new property to the bottom of the table.
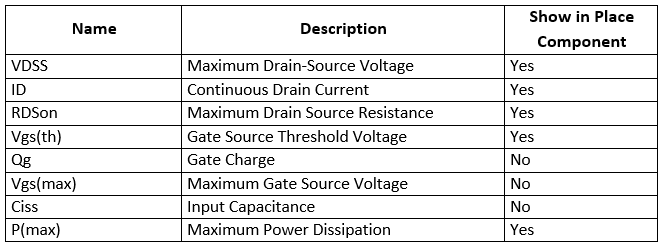
Step 28: Repeat steps 22-27 for the following properties:
Step 29: Select the Models tab to import relevant model and footprint data.
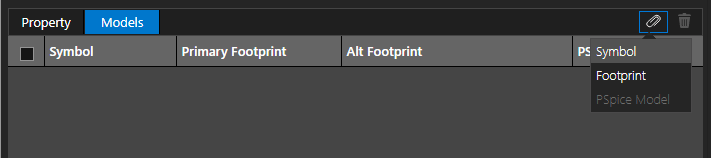
Step 30: Select Attach > Symbol.
Step 31: The Symbols window opens with a list of pre-defined libraries and symbols. Select libraries/symbols/templates.
Step 32: Check NMOS and PMOS under Symbol Name and select Attach. This will allow either symbol to be used.
Step 33: Select Attach > Footprint.
Step 34: The Footprints window opens. Select and check TO220AB from the footprint list and click Attach. The footprint is attached to both symbols.
Step 35: Select Save to save the category. The category is added to the list under My Workspace.
Creating a Workspace Part from Ultra Librarian
Step 36: Select Ultra Librarian in the Categories list.
Step 37: If prompted, log in with your Ultra Librarian username and password.
Note: Don’t have an Ultra Librarian account? Create an account for free here.
Step 38: Enter SI2347DS into the search field and press Enter to search. This will search for all parts with SI2347DS in the name.
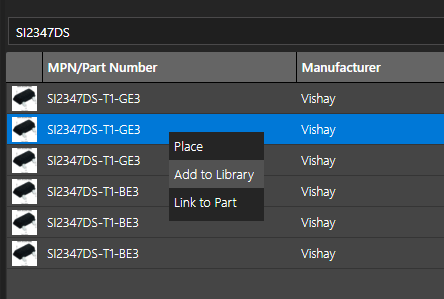
Step 39: Right-click one of the parts and select Add to Library. The part is downloaded.
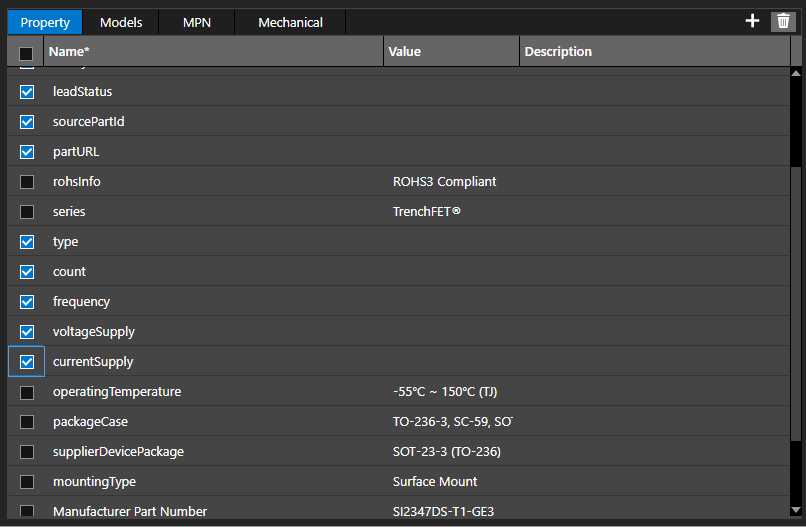
Step 40: The Component window opens. In the Property table, check any parameters with no value or description defined. Click Delete to delete the parameters.
Step 41: Select MOSFET from the Category dropdown and Active from the Lifecycle dropdown. The MOSFET parameters defined in the previous section are added to the Property list.
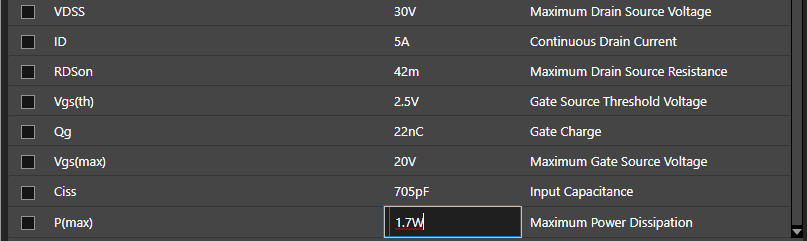
Step 42: Define the MOSFET parameters as shown below:
- VDSS: 30V
- ID: 5A
- RDSon: 42m
- Vgs(th): 2.5V
- Qg: 22nC
- Vgs(max): 20V
- Ciss: 705pF
- P(max): 1.7W
Step 43: Select the Models tab. A new symbol and footprint were downloaded from Ultra Librarian automatically. Right-click NMOS and select Remove Symbol Association to remove the N-channel symbol.
Step 44: Select Attach > Footprint.
Step 45: Uncheck the option for TO220AB to remove the TO220 footprint from the component. Click Attach. The primary footprint is now the SOT-23 footprint that was downloaded from Ultra Librarian.
Note: Right-click a checked footprint and select Set as Primary to set the footprint as the primary footprint.
Step 46: Click Save to save the component.
Step 47: Select the MOSFET category under My Workspace to view the saved part. The part is shown with the defined properties and its symbol and footprint.
This completes the bonus lesson for library creation.
