Optional Lesson: Cloud Workspace Configuration
This walk-through demonstrates how to configure workspaces in OrCAD X Capture 25.1. Workspaces enable the cloud-based management of libraries and files within OrCAD X Capture. This will allow you to manage your own files in the cloud or enable easy sharing of the library and design with team members for efficient collaboration. After you complete the topic, you will be able to:
- Create a workspace
- Configure a local or cloud workspace
- Add users to a workspace to create a shared access to files and libraries
To follow along, continue with the design from the last topic or use the provided design files.
 Open in New Window
Configuring Your Cloud Workspace
Step 1: Open the continued design in OrCAD X Capture CIS.
Note: To create a shared workspace, advanced cloud capabilities are needed. Once a workspace is created, it can be shared with additional users who can participate and manage content in the workspace as needed, including publishing parts. If you do not see the ability to share workspaces and would like to, contact us here.
Step 2: Select View > Workspace > Configuration from the menu. The Workspace Configuration window opens.
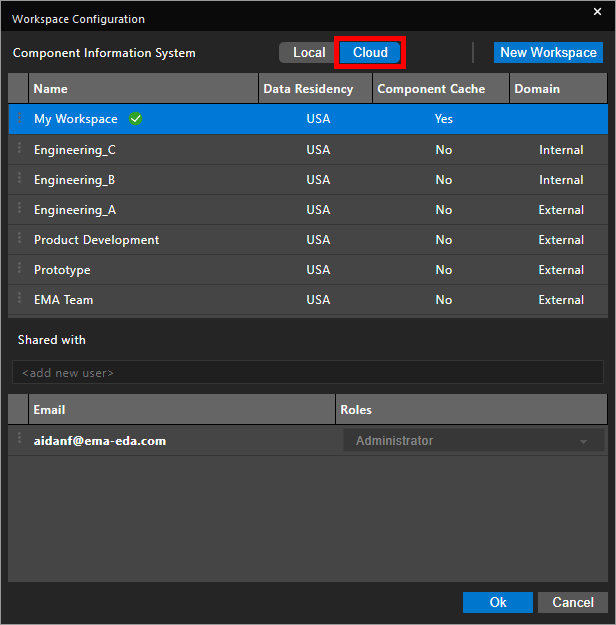
Step 3: Select Cloud for CIS Data Source.
Note: Select Local to work with the existing CIS database.
Step 4: View the available workspaces. By default, My Workspace is included in the workspace configuration. This is your personal cloud workspace that can be used to manage and access libraries and files in the cloud.
Creating a Shared Workspace
Step 5: Select New Workspace to create a new workspace.
Step 6: Enter the name Engineering into the Name field. Add a description if desired.
Step 7: Select the appropriate location from the Data Residency dropdown.
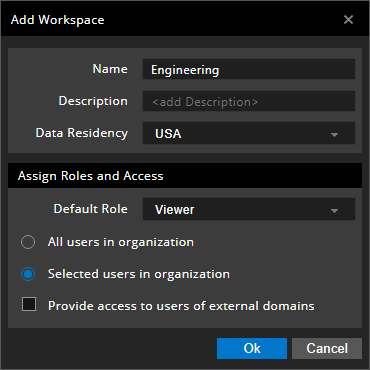
Step 8: From here, you can also define the default role for new users and whether to allow workspace access for all users or selected users in your organization. Leave the other settings as the defaults and click OK to create the workspace.
Step 9: Select the new workspace. Your Cadence user profile is automatically added to the Members list at the bottom of the window.
Adding Users to a Workspace
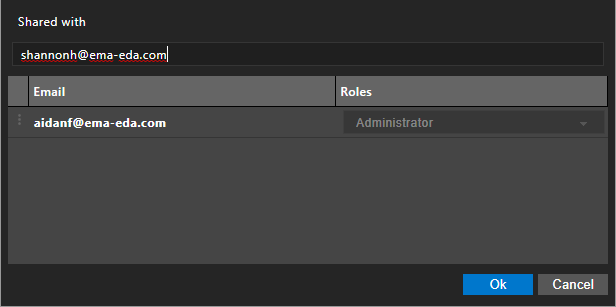
Step 10: Enter the Cadence email account of a team member into the Add New User field for the new workspace to add the user to the workspace. Press Enter.
Step 11: Select the user role from the dropdown next to their name. The following roles are available:
- Admin: Has complete access to all objects in a shared workspace and can perform any possible task.
- Designer: Can check in or check out a design to update and modify it.
- Librarian: Has part authoring, editing, and publishing capabilities.
- User: Provides read-only access to objects in a shared workspace.
Note: The creator of a workspace always has a full admin role.
Setting a Default Workspace
Step 12: Right-click the new workspace and select Set as Default. The green checkbox moves from My Workspace to Engineering, indicating that it is now the default workspace.
Step 13: Click OK to save the settings and close the window.
The workspace can now be used to share libraries and design files with team members for efficient cloud-based collaboration.
