Component libraries, symbols, and footprints are critical for producing an accurate PCB design; however, creating and managing a part library and verifying components can take a lot of effort and time. Capture CIS includes a workspace environment to quickly manage and add components in OrCAD to a cloud-based part library with:
- Templated part categories to create consistency
- Mapping of pre-existing symbols and footprints
- Access to verified symbols and footprints from SamacSys, Ultra Librarian, and SnapEDA
- Automatic population of parametric data
This quick how-to will provide step-by-step instructions on how to add components to the cloud workspace in OrCAD X Capture CIS.
How-To Video
 Open in New Window
Activate Workspaces in OrCAD X Capture CIS
Step 1: Open OrCAD X Capture CIS and create a new schematic project.
Step 2: Select Place > Component from the menu. Unified CIS opens with access to included libraries as well as Ultra Librarian, Samacsys, and SnapEDA to find verified components and models for your designs.
Step 3: Select Workspaces. This provides access to cloud part libraries.
Note: To configure the selection of local or cloud libraries, right-click on My Workspace and select Workspace Configuration. In the Workspace Configuration window, select Local to access parts from your locally hosted CIS database or Cloud to access the part library found in Workspaces as the CIS Data Source and click OK. Setting this configuration will activate the corresponding CIS Data Source when linking database components in the Part Manager.
Create a New Library Category

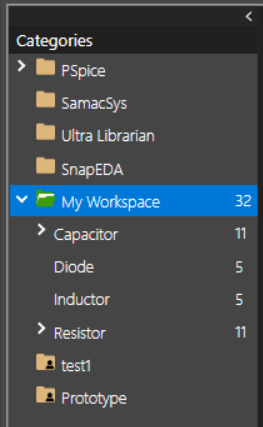
Step 4: Right-click on My Workspaces and select Add Category.
Step 5: Enter IC for the Name and select the Part Type as Electrical.
Note: This configuration will be used as a template for any component added to the category.
Step 6: Click the + icon for the Properties to add a standard property for any component added in the category.
Step 7: Double-click the Name cell and enter Manufacturer Part Number.
Step 8: Select the drop-down list for Visibility on Schematic and select Value.
Note: The following options are available for Visibility on the Schematic:
- Do Not Transfer: The property is not annotated to the schematic.
- Do Not Display: The name or value of the annotated property is no displayed on the schematic canvas.
- Use Library Setting: The property is annotated to the schematic. If the same property is also defined at the library level, its visibility is set by the display option in the library.
- Value: the value of the annotated property is displayed on the schematic
- Name and Value: The name and value of the annotated property are displayed on the schematic.
- Name Only: Only the name of the annotated property is displayed on the schematic.
- Both if Value Exists: Both the name and value of the annotated property are displayed on the schematic if the value exists.
- Value if Value Exists: The value of the annotated property is displayed on the schematic if the value exists.
Step 9: From the Value Type drop-down list, select Numeric.
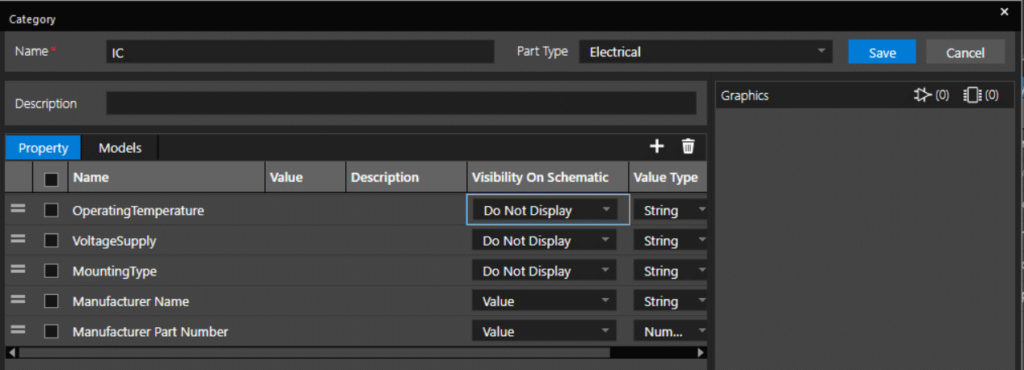
Step 10: Repeat this process to add the following properties:
| Name | Visibility on the Schematic | Value Type |
| Manufacturer Name | Value | String |
| MountingType | Do Not Display | String |
| VoltageSupply | Do Not Display | String |
| OperatingTemperature | Do Not Display | String |
Note: These properties can be modified at any time by right clicking the category and selecting Edit.
Step 11: Select the Models tab. Here you can configure a default symbol and footprint for the category.
Note: To add a model, select the file icon then choose symbol or footprint. This will activate a library of symbols or footprints to select from. Choose the desired model and select Attach.
Step 12: Select Save. The IC category was added under Workspaces.
Create a New Library Part in OrCAD X Capture CIS
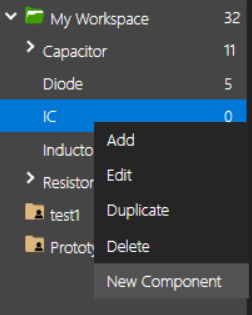
Step 13: Right-click on the IC category and select New Component to create a component based on the selected category.
Note: Here you have additional options to add a subcategory, edit the category, duplicate the category, and delete a category.
Step 14: Enter EMA-0001 as the Part Number for the new component.
Step 15: Under Lifecycle, select In Development from the drop-down list.
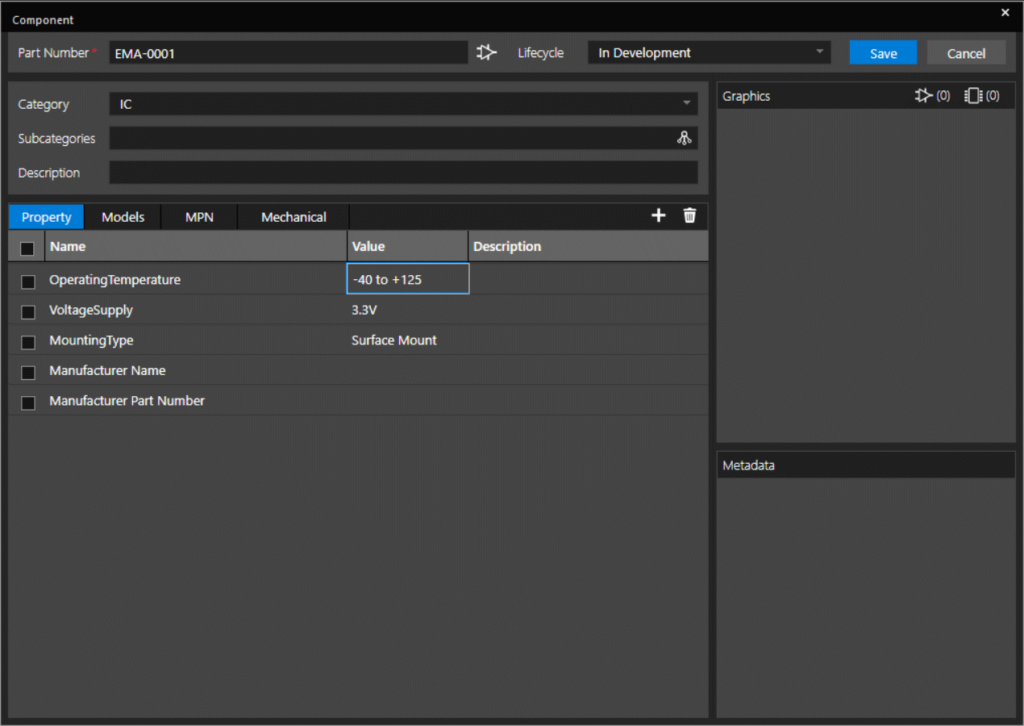
Step 16: Double click the OperatingTemperature field and enter a value of -40 to +125.
Step 17: Double click the VoltageSupply field and enter a value of 3.3V.
Step 18: Double click the MountingType field and enter a value of Surface Mount.
Step 19: Select Save. The new component has been added to the library.
Linking a Manufacturer Part in OrCAD X Capture CIS
Step 20: Select Ultra Librarian from the categories. If prompted, enter your credentials to log into Ultra Librarian.
Note: Don’t have an Ultra Librarian account? Sign up here.
Step 21: Ultra Librarian can be searched by part number, key word, or description. In the search bar, enter IC REG LINEAR 3.3V. Click the Search icon or Enter on the keyboard.
Step 22: Select the MIC5504-3.3YM5-TR component to review the part properties, symbol, and footprint.
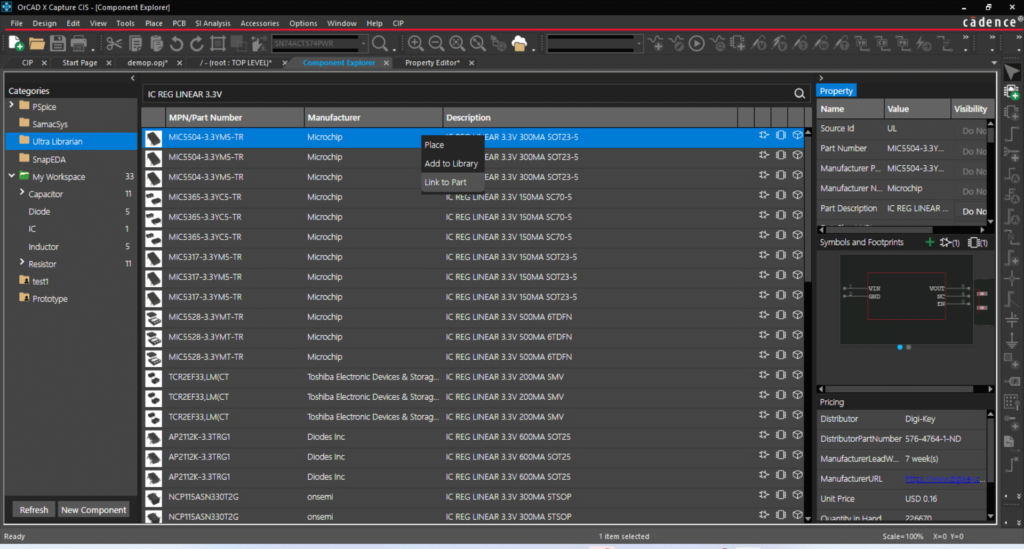
Step 23: Right-click and select Link to Part. A pop-up window will appear with the required next steps. Click OK.
Step 24: Select the IC category in My Workspace and clear the string in the search bar. The part created is shown.
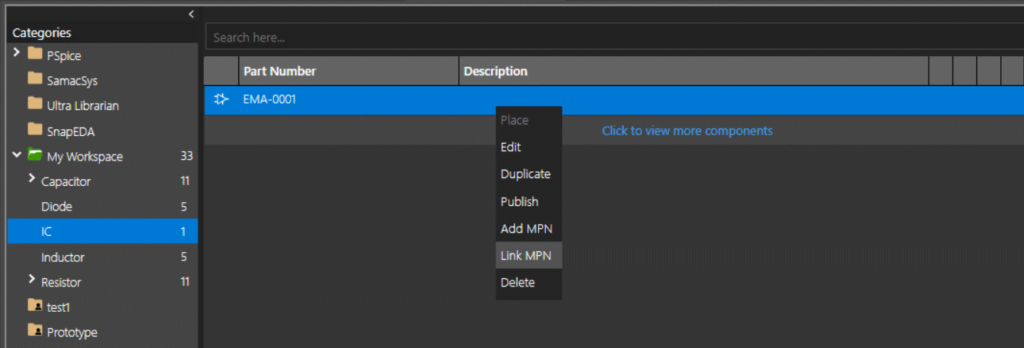
Step 25: Right-click and select Link MPN.
Step 26: Review the populated information. Check the box next to Properties.
Step 27: Click Save. The manufacturer information has been added to the part.
Add Components in OrCAD from a Manufacturer
Step 28: Select Ultra Librarian from the Categories.
Step 29: Enter SY89873LMG into the search bar and click Search.
Step 30: Select the first entry, SY89873LMG, from the returned results.
Step 31: View the component. The following information is provided for review:
- Model availability
- Component properties and parametric data
- Symbol and footprint preview
- Pricing information
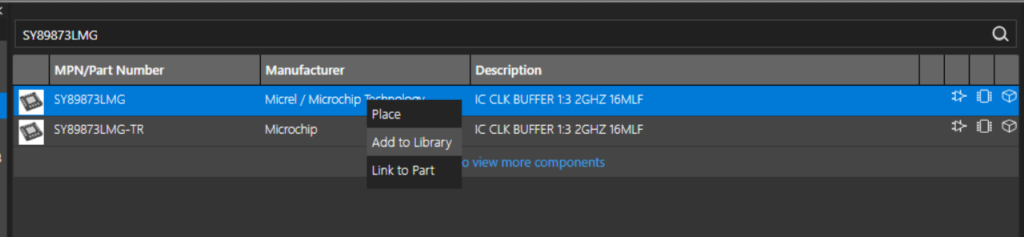
Step 32: Right-click on the desired search result, SY89873LMG, and select Add to Library. The component is downloaded from Ultra Librarian.
Note: You can also place the part directly into the schematic without adding it to your component library by selecting Place Part.
Step 33: When download is complete, the Component window opens with parametric data and information pre-populated.
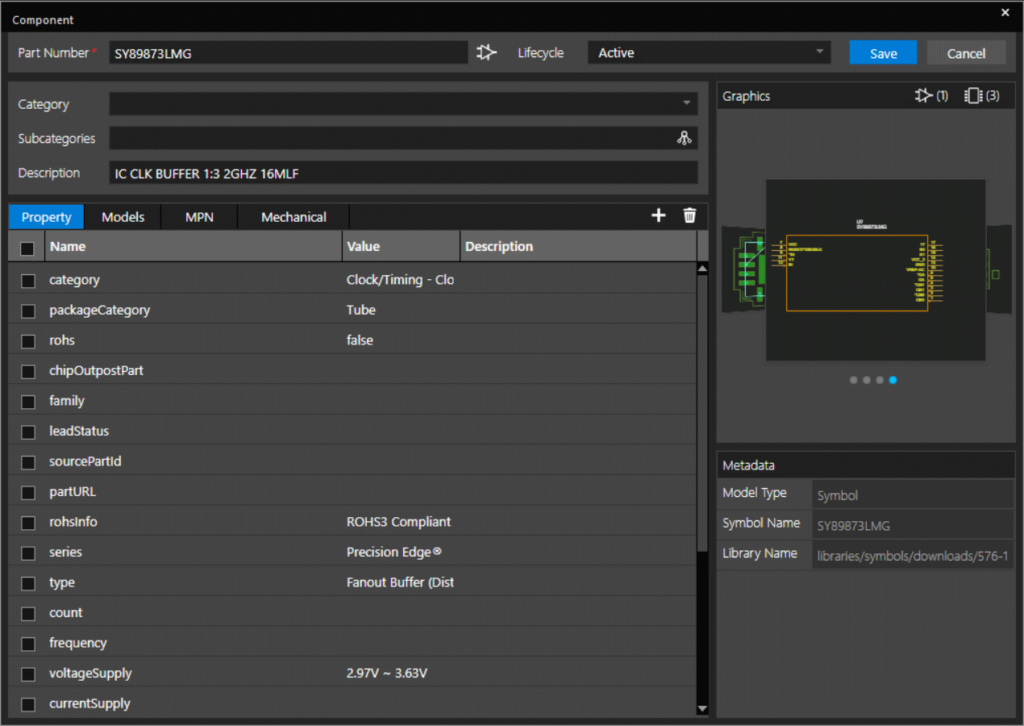
Step 34: Under Lifecycle, select Active.
Note: The following Lifecycle options are available:
- In Development: Component is being developed.
- Pre-Release: The component is developed but not released yet.
- Active: The component is actively available for use in designs.
- NRFND: Not recommended for new design.
- Obsolete: The component is no longer available for use.
Step 35: Under Category, select the newly created IC category.
Step 36: Information from distributors and manufacturers may vary. Check the Properties box to associate the pre-populated properties with the new component.
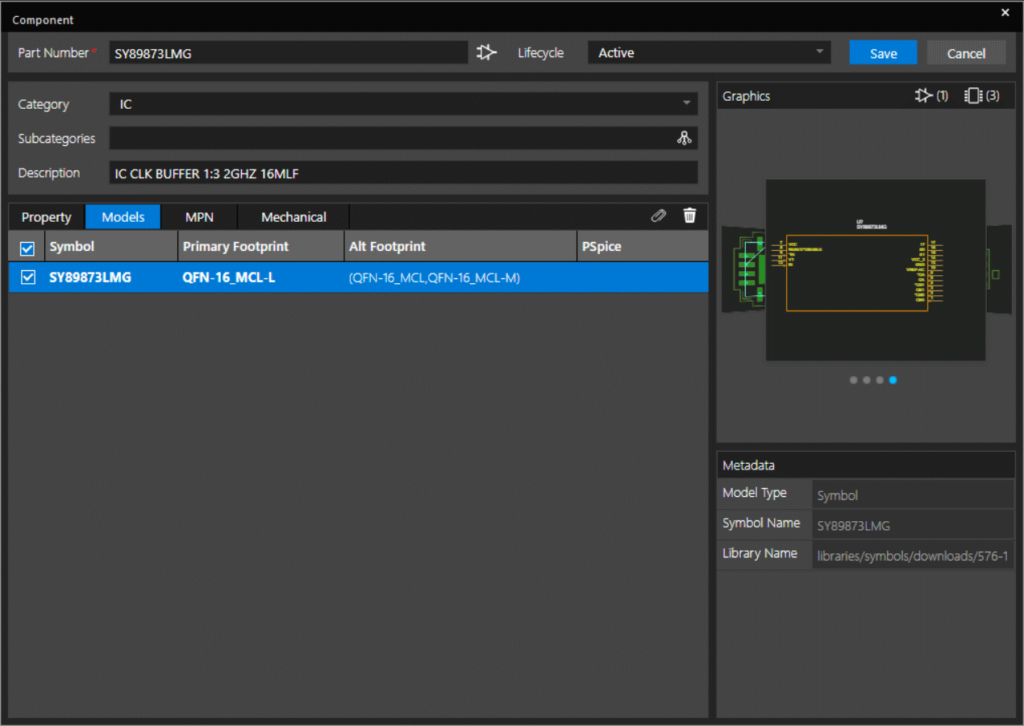
Step 37: Select the Models tab and click to select Symbol check box to associate the provided model with the part in the library.
Step 38: Select Save.
Step 39: Under My Workspace, select the IC category. View the newly added part.
Step 40: Right-click the component and select Place.
Step 41: Click to place the component in the schematic. Press Escape on the keyboard when finished.
Add Components in OrCAD to Shared Workspaces (Optional)
Note: If you are collaborating with team members using a shared workspace, parts can be promoted to be accessed by all users.
Step 42: Select the Component Explorer tab.
Step 43: Right-click the newly created IC, SY89873LMG, and select Publish.
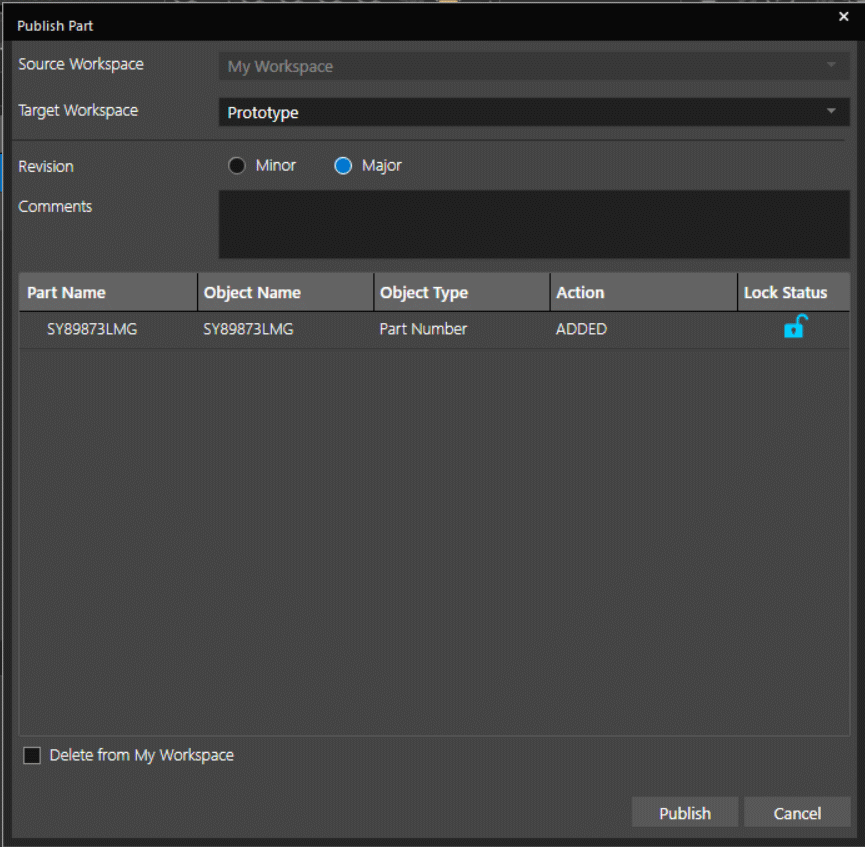
Step 44: In the Publish Part window, select the desired Workspace from the drop-down selection.
Step 45: Configure the revision as Minor or Major and add comments as required.
Step 46: Select Publish.
Note: Other options are available to lock the component to prevent modifications and to check Delete from Workspace to remove the component from your workspace.
Step 47: View the Shared Workspace. The part has been added to the library.
Wrap Up & Next Steps
Use workspaces to efficiently create and manage component libraries for your designs as well as improve collaboration with team members in OrCAD X Capture CIS. Test out this feature and more with a free trial of OrCAD X.

