

A centralized component database is an effective way to ensure consistent use of approved parts across an organization. However, maintaining data integrity requires clearly defined user roles and permissions to control how new components are created, reviewed, and approved. To maintain accuracy, consistency, and reliability of your component database, administrators can easily configure user roles and permissions in CIP to ensure only authorized users can add or approve new components.
This quick how-to will provide step-by-step instructions on how to configure user roles and permissions in CIP.
How-To Video
 Open in New Window
Configure User Roles and Permissions in CIP
Step 1: Select CIP > Open CIP from the menu.
Step 2: Log into CIP with an administrator account.
Step 3: To define user roles and permissions, expand and select Admin > Users and Permissions > Roles.
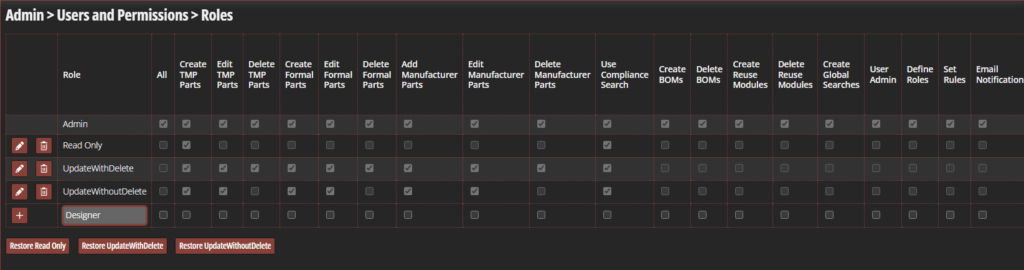
Step 4: The role table opens, showing the default Admin, Read-Only, Update with Delete, and Update Without Delete roles.
To add a new Designer role, enter Designer into the text field at the bottom.
Step 5: For the new designer role, check the following options:
- Create TMP Parts
- Edit TMP Parts
- Delete TMP Parts
- Add Manufacturer Parts

Step 6: Click the plus sign to add the Designer role to the table. Designer is added to the top, under Admin.
Configure User Roles in CIP
Step 7: To add a Librarian role, enter Librarian into the empty text field at the bottom.
Step 8: Check the All option to allow librarians to perform all tasks in CIP.
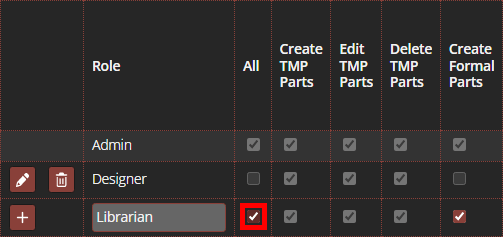
Step 9: Click the plus sign to add the Librarian role to the table. Roles are added in alphabetical order. Add additional roles as needed based on your company’s structure and policy.
Assigning Users to Roles
Step 10: To assign users to the newly-created roles, select Admin > Users and Permissions > Users from the CIP sidebar menu.
Step 11: The Users table opens, showing the list of roles defined in CIP. To add a new user, enter the user’s name into the Username field.
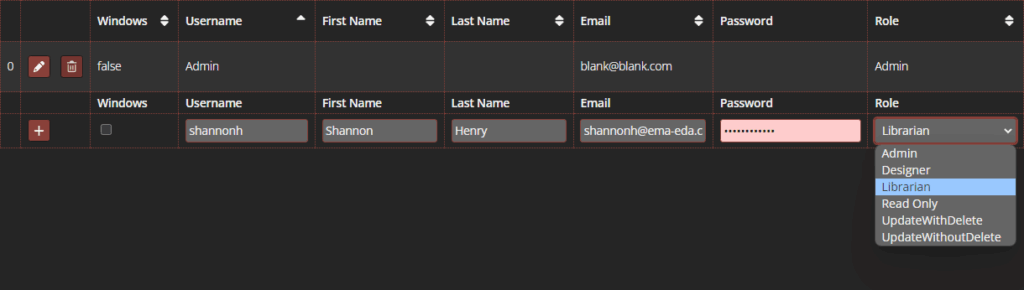
Step 12: Enter the user’s first and last name, their email, and a default password. Select the desired role for the user, for this example, Librarian.
Note: Check the option under Windows to associate the user with their Windows account.
Step 13: Check the options under Notifications to notify the user when parts are inserted, updated, or deleted.

Step 14: Select the plus sign to add the user to the list. The user will have the Librarian permissions assigned earlier.
Wrap Up & Next Steps
Quickly and easily configure user roles and permissions in CIP to leverage a centralized component management system without compromising data integrity. Get more step-by-step instructions
for CIP at EMA Academy.

