Checking a design for errors is a crucial step in the schematic and PCB design processes to guarantee a functional end design. Design rule checks during schematic capture can help prevent design flaws and other design-related errors, however, not all errors reported during a schematic design rule check are relevant for the design. With OrCAD X Capture, easily waive and suppress DRC errors to prevent long error reports and focus on the relevant design errors.
This quick how-to will provide step-by-step instructions on how to suppress DRC errors in OrCAD X Capture.
To follow along, download the provided files above the table of contents.
Learn how to perform design rules checks during the PCB layout here.
How-To Video
 Open in New Window
Running a Design Rule Check
Step 1: Open the provided design in OrCAD X Capture.
Step 2: Select PCB > Design Rules Check from the menu.
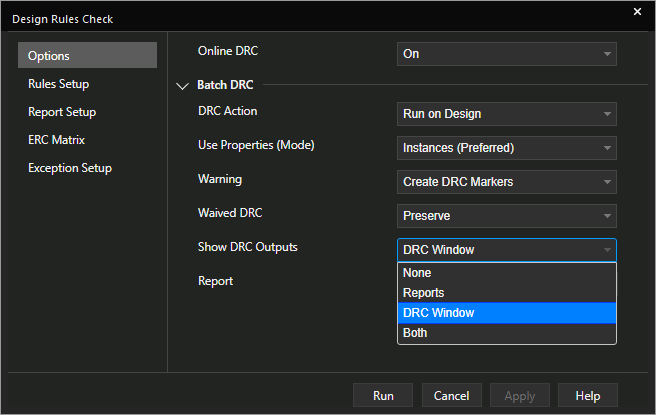
Step 3: The Design Rules Check window opens. Here you can configure a batch design rule check for the design. Under Batch DRC, select Run on Design for the DRC Action.
Step 4: Under User Properties, select Instances. This will run the design rule check only on part instances placed on the schematic page.
Note: If you are creating a hierarchical design, select Occurrences. This will run the design rule check each time the part instance occurs in a schematic within the design hierarchy.
Step 5: Under Warning, select Create DRC Markers. This will create DRC markers to quickly identify errors in the schematic.
Step 6: Under Waive DRC, select Preserve. This will preserve waived DRCs in the DRC list.
Step 7: Under Show DRC Outputs, select DRC Window. This will print the DRCs to the DRC panel rather than an external file.
Step 8: Select the ellipsis for Report. Browse to a location to save the DRC report. Enter a name for the report and click Open.
Step 9: Click Run to start the design rule check.
Note: If prompted that the undo/redo cache will be cleared, click Yes.
Step 10: A message appears that one or more errors or warnings were encountered. Click No to view the messages in the DRCs panel as opposed to the session log.
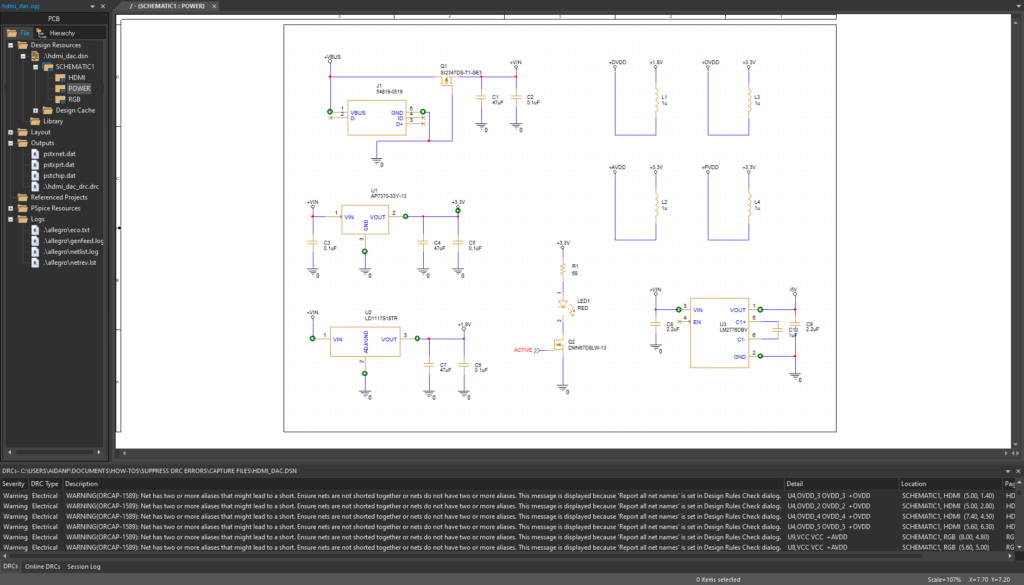
Step 11: The DRCs panel opens automatically at the bottom of the window, listing all DRC warnings and errors found. Several green DRC markers are shown in the schematic canvas.
Scroll through the DRC list. Most of the DRC warnings listed show that several nets in the design have two or more aliases assigned.
Note: These warnings indicate that the actual net aliases in the design don’t match the pin names on the ICs they connect to. This waning can be ignored as it doesn’t cause any shorts or change the net alias itself.
Viewing DRC Information
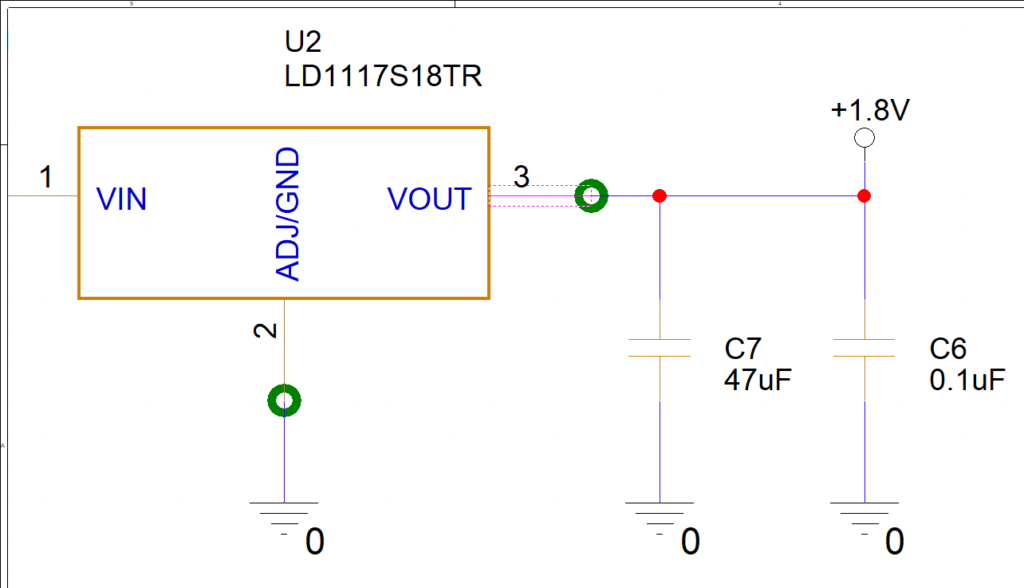
Step 12: Double-click an error in the list to be brought to the location of its corresponding marker in the schematic. The affected pin is highlighted.
Note: Hold CTRL on the keyboard and scroll up to zoom in as required.
Step 13: Select the marker. Right-click and select Edit Properties.

Step 14: The View DRC Marker window opens, showing more information on the error. This window shows the same warning as the table. The net alias in question is +1.8V, while the pin on U2 is labeled as VOUT. Click OK to close the window.
Suppress DRC Errors: Waiving
Note: DRC errors can be suppressed by waiving the affected error(s) if they are insignificant.
Step 15: Hold CTRL on the keyboard and select a few DRC markers in the design.
Step 16: Right-click any of the markers and select Waive DRC.
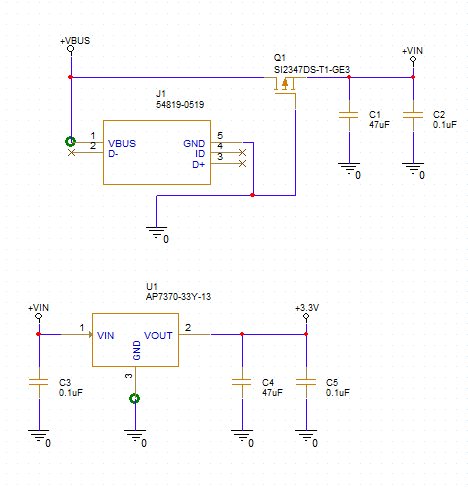
Step 17: Click a blank area of the schematic to deselect the markers. The markers disappear, indicating that they are waived.
Note: The waived errors remain listed in the DRC panel.
Suppress DRC Errors: Configuring Exceptions
Note: If an insignificant warning or error occurs with each design rule check run on the design, the check can be fully suppressed. The warning will remain suppressed in future sessions of OrCAD X Capture.
Step 18: Select PCB > Design Rules Check from the menu.
Step 19: Select the Exception Setup tab from the left side of the window.
Step 20: Select Add New to add a new exception to the table.
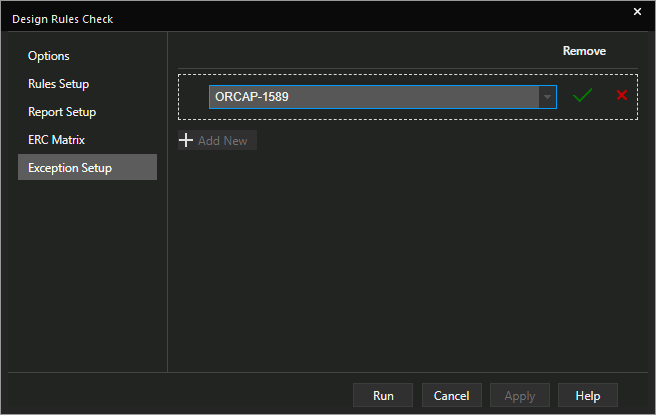
Step 21: Choose ORCAP-1589 from the drop-down menu and click the check to add the exception.
Step 22: Click Run. When prompted, click Yes to proceed and clear the undo/redo cache and No to view the errors in the DRC panel.
Note: If prompted to save the design file, click OK.

Step 23: View the DRC list again. The warnings for net name conflicts are no longer listed. The ORCAP-1589 warning is not listed in the DRC report or panel and the warning has been suppressed.
Wrap Up & Next Steps
Quickly waive and suppress DRC errors in the schematic after design rule errors have been reviewed to ensure accurate information is communicated to the PCB layout with OrCAD X Capture. Test out this feature and more with a free trial of OrCAD. Want to learn more about Capture? Get access to free how-tos, courses, and walk-throughs at EMA Academy.
