With many parts in the schematic design, it can be time-consuming to identify and locate specific components. The Highlight Parts by Property App in OrCAD Capture helps users color-code parts to quickly identify components on the schematic based on a designated property. The Highlight Parts by Property App can be configured for a variety of uses including:
- Identifying components based on company part status to locate unapproved or obsolete parts
- Identifying components with missing PCB footprints
- Identifying components with a specified tolerance
This how-to will provide step-by-step instructions on how to use the Highlight Parts by Property App in OrCAD Capture to color-code parts on the schematic.
How-To Video

Editing Object Properties
Step 1: Open the desired design in OrCAD Capture.
Step 2: Select the .dsn from the project hierarchy.
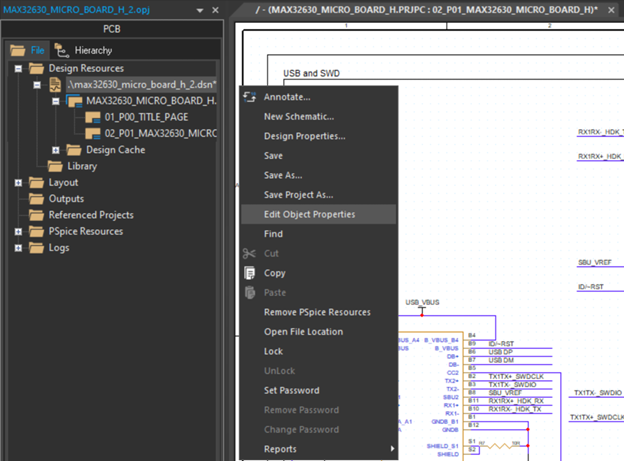
Step 3: Right-click the .dsn file and select Edit Object Properties to open the Property Editor tab.
Note: The Highlight Parts by Property App will search any of the properties included in the Property Editor Tab.
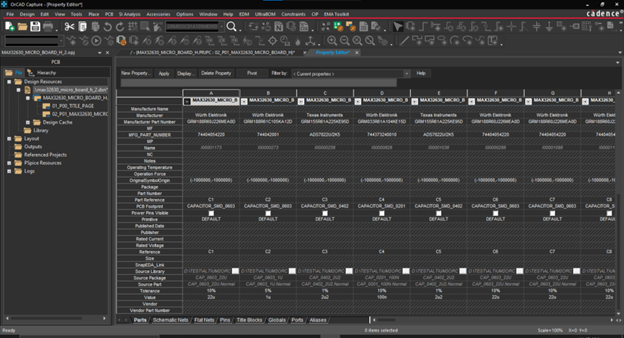
Step 4: Find the tolerance row and ensure component tolerances are assigned. Close the Property Editor tab.
Note: To add a new property, select the New Property button. Add a name for the property and click OK.
Configuring Highlight Parts By Property App
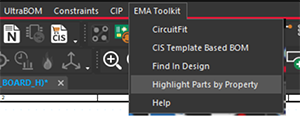
Step 5: With the .dsn file selected in the project hierarchy, select EMA Toolkit > Highlight Parts by Property from the menu.
Note: This will bring up Highlight Parts by Property Window. If Highlight Parts by Property is not available, make sure the .dsn file is selected in the project hierarchy.
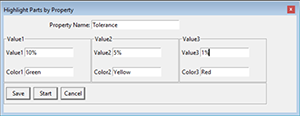
Step 6: Configure the Highlight Parts by Property App. Set the following information:
- Property Name: Tolerance
- Value1: 10%
- Color1: Green
- Value2: 5%
- Color2: Yellow
- Value3: 1%
- Color3: Red
Note: When implementing the Highlight Parts by Property App, the Property Name should match the property listed in the Property Editor. This will be the property inspected. The values and colors can be customized to identify the desired components. The following colors can be configured:
- Blue
- Red
- Yellow
- Green
- Rose
- LightYellow
- DarkPurple
- DarkTeal
- LightGreen
- SkyBlue
- LightBlue
- Pink
- Lavender
- Aqua
- Brown
- Black
- Turquoise
- Purple
- DarkRed
- White
- Purple
- DarkBlue
- DarkGreen
Highlighting Parts on the Schematic
Step 7: Select Start to run the Highlight Parts by Property App.
Note: Settings are saved and applied when selecting the Start button.
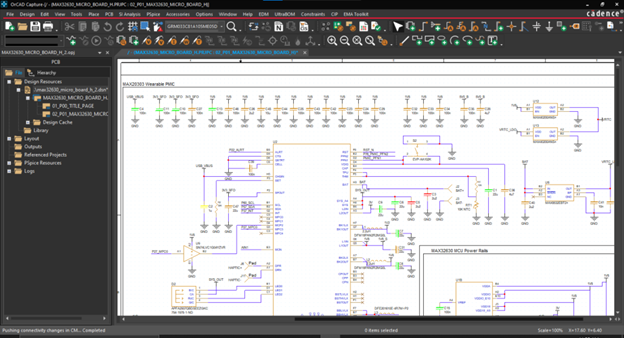
Step 8: View the schematic. Parts are color-coded based on the component tolerance.
Step 9: Right-click the .dsn file in the project hierarchy and select Edit Object Properties.
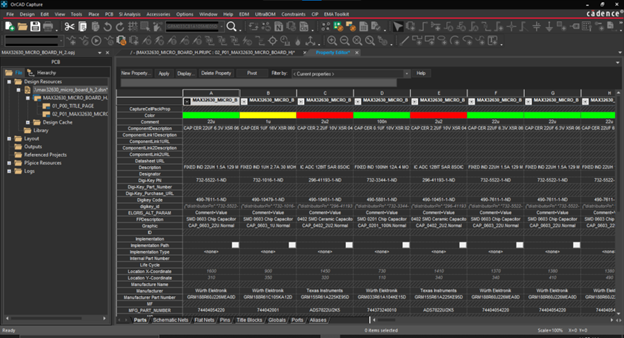
Step 10: A Color property has been added to the object properties table.
Wrap Up & Next Steps
Easily highlight parts based on specific properties throughout the schematic design with real-time color-coded visual indicators and eliminate the need for manually checking hundreds of parts in your design with the Highlight Parts by Property App. This app and others are part of the EMA Toolkit, one of the benefits of EMA Support +. The EMA Support + program is available to all EMA customers on active support and includes additional benefits and tools to expedite the PCB design process, such as time saving apps, additional training, and more. See what’s included with EMA Support + and learn how to get access to these exclusive benefits.

