In today’s fast-paced design environments, the PCB design process is typically collaborative, leveraging each designer’s expertise to efficiently create and review designs. Using a shared server eliminates the need to send design materials back and forth; however, with remote locations on the rise, multiple designers accessing libraries and designs, and manual management design data the possibility of errors increases. You can use workspaces in OrCAD X Capture CIS to easily share libraries and designs with team members for efficient collaboration. Workspaces in OrCAD X Capture CIS provides:
- Cloud management of files and libraries
- Design locking during editing
- User assignment and permissions
This quick how-to will provide step-by-step instructions on how to use workspaces in OrCAD X Capture CIS to keep your designs organized and up to date.
How-To Video
 Open in New Window
Creating a Cloud Workspace
Step 1: Open OrCAD X Capture CIS.
Note: Make sure to launch OrCAD X Capture CIS with a license of OrCAD X Standard or OrCAD X Professional. If prompted, log in with your Cadence username and password.
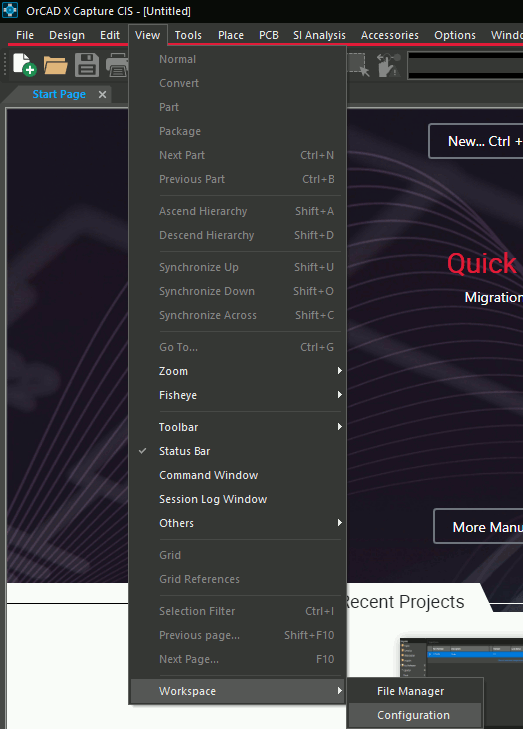
Step 2: Select View > Workspace > Configuration from the menu. The Workspace Configuration window opens.
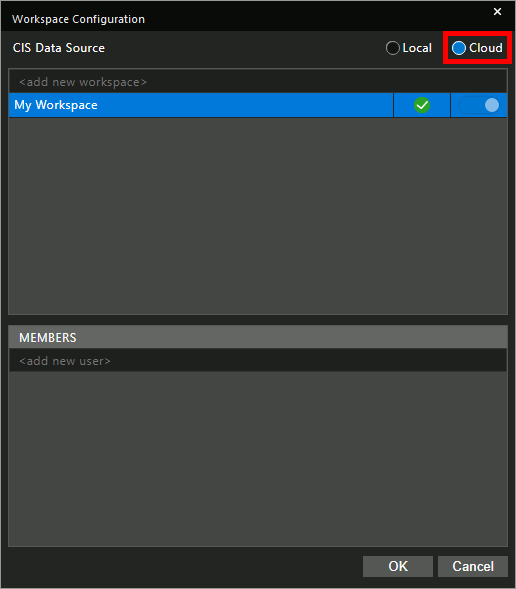
Step 3: Select Cloud for CIS Data Source.
Note: Select Local to work with the existing CIS database. To collaborate with team members, users must set this option to Cloud.
Step 4: Enter the name Engineering into the Add New Workspace text field. Press Enter to create the workspace.
Adding Users to a Workspace
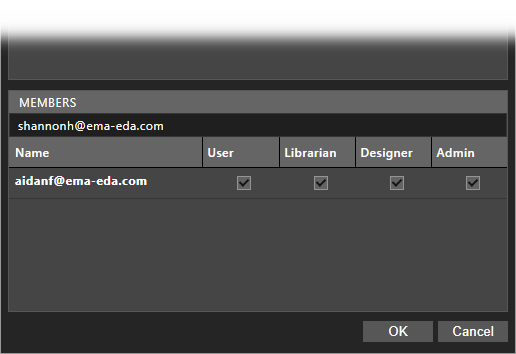
Step 5: Your Cadence user profile is automatically added to the Members list at the bottom of the window. Enter a username of a team member to add the user to the workspace. Press Enter.
Note: The username must match the Cadence email account.
Step 6: Configure the user roles with the checkboxes. The following roles are available:
- Admin: Has complete access to all objects in a shared workspace and can perform any possible task.
- Designer: Can check in or check out a design to update and modify it.
- Librarian: Has part authoring, editing, and publishing capabilities.
- User: Provides read-only access to objects in a shared workspace.
Step 7: Right-click the new workspace and select Set as Default.
Note: The green checkbox moves from My Workspace to Engineering, indicating that it is now the default workspace.
Step 8: Click OK to save the settings and close the window.
Creating a Workspace Project
Step 9: Select File > New Project from the menu.
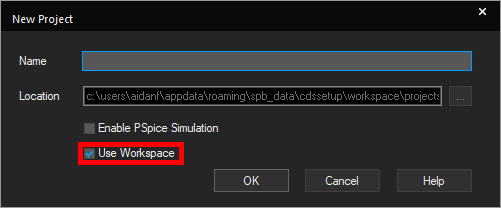
Step 10: The New Project window opens. Check the option for Use Workspace.
Note: This will save the project files in your default project folder %HOME%\cdssetup\workspace\projects instead of a specified folder.
Step 11: Name the project Full_Bridge_Rectifier and click OK. The project is created in your personal cloud workspace and opened.
Use Workspaces in OrCAD X Capture CIS to Create Parts
Step 12: Select Place > Component from the menu.
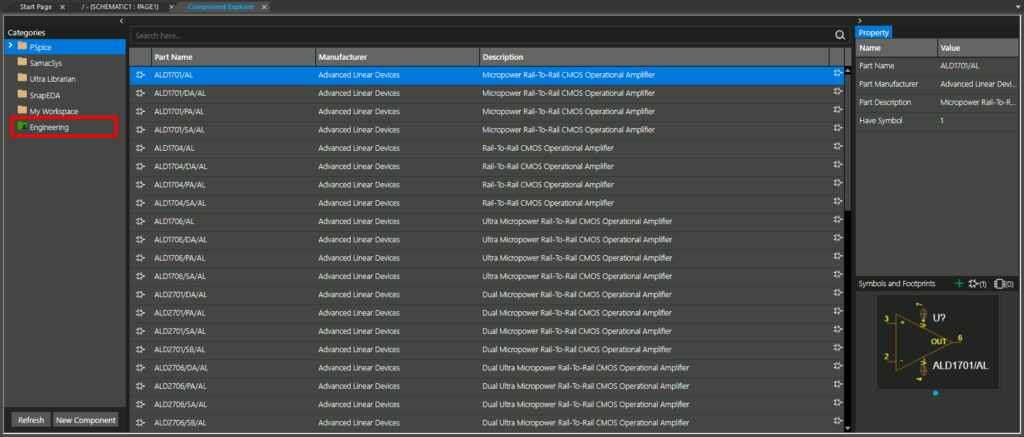
Step 13: The Component Explorer tab opens. The Categories panel on the left lists all categories from which parts can be placed in the design, including PSpice, SamacSys, Ultra Librarian, SnapEDA, and custom workspaces. Select the green Engineering category.
Note: Learn how to use the Component Explorer tab and unified CIS here.
Step 14: Select New Component to add a new component.
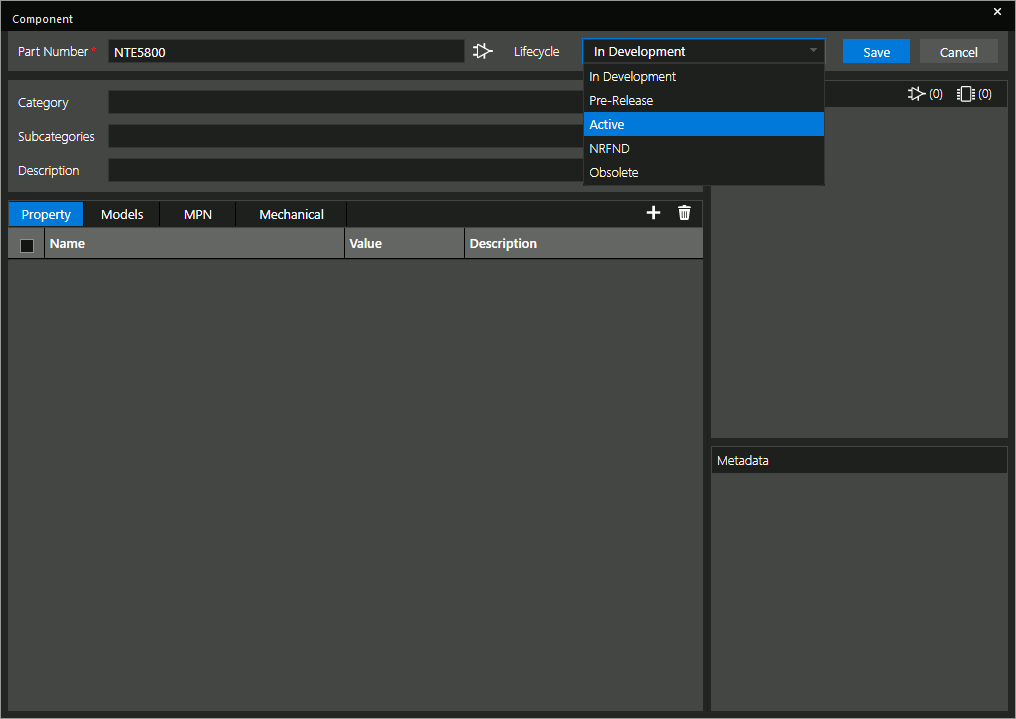
Step 15: The Component window opens. This example will model the diode after the NTE5800 rectifier diode. Enter NTE5800 for the Part Number and select Active from the Lifecycle dropdown.
Step 16: Select Diode from the Category dropdown. The Property tab is automatically populated with default values and the default symbol and footprint for the corresponding category.
Note: Learn how to add components in OrCAD X Capture CIS here.
Step 17: Select the uppermost checkbox to include all properties.
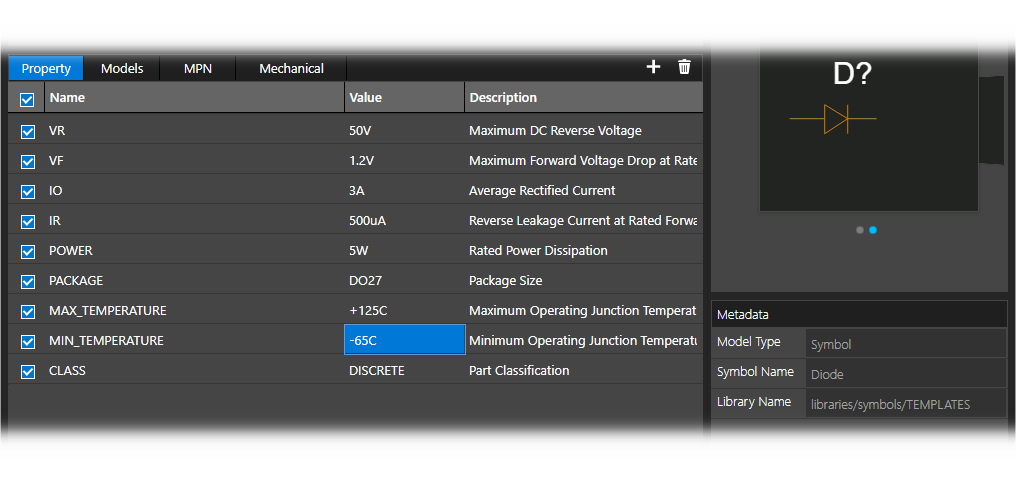
Step 18: Configure the following component values:
- VR: 50V
- VF: 1.2V
- IO: 3A
- IR: 500uA
- Power: 5W
- Max Temperature: +125C
- Min Temperature: -65C
Step 19: Click Save to save the component.
Use Workspaces in OrCAD X Capture CIS to Publish Parts
Note: The part must be published to be added to a shared workspace.
Step 20: Expand the My Workspace folder and select Diode. The NTE5800 is listed here with any previously created diodes.
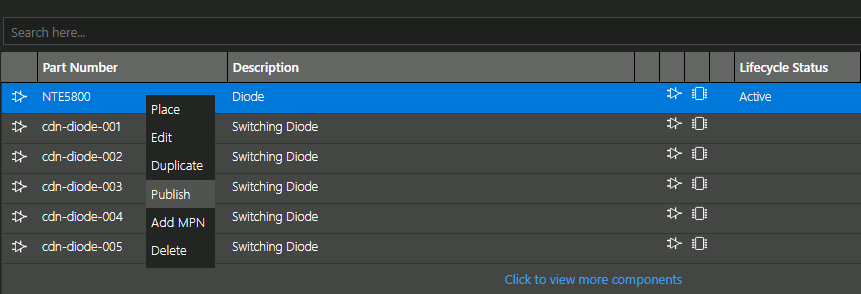
Step 21: Right-click the diode row and select Publish.
Note: You can also add a manufacturer part number for connection to LiveBOM. Learn more about using LiveBOM with this how-to.
Step 22: The Publish Part window opens. Engineering is automatically selected as the target workspace. Select Major to publish the first revision as 1.0 and add any desired comments.
Step 23: Check Delete from My Workspace to remove the part from the My Workspace workspace.
Step 24: Select Publish. The part is removed from your personal workspace and moved to the Engineering workspace.
Step 25: Select the Engineering workspace. NTE5800 is now listed as a part.
Note: For a locally hosted component database with additional functionality, an integrated new part introduction process, customizable user permissions, and more, upgrade to OrCAD CIP.
Use Workspaces in OrCAD X Capture CIS to Publish Projects
Step 26: Close the Project Manager to close any open projects. By default, all workspace projects are saved to your personal workspace.
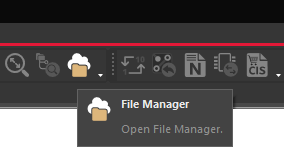
Step 27: A project can be published to allow all users assigned to the workspace to edit or review the design per their assigned user roles. Select the File Manager button from the toolbar. The File Manager tab opens.
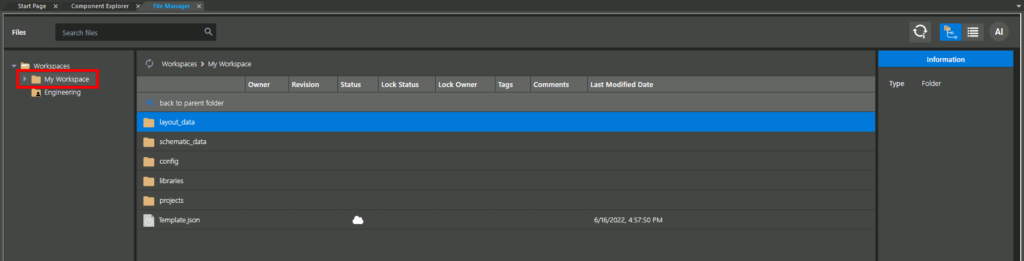
Step 28: Select My Workspace under Workspaces.
Step 29: Double-click Projects to open the Projects folder. All workspace projects are listed.
Step 30: Right-click Full_Bridge_Rectifier and select Publish.
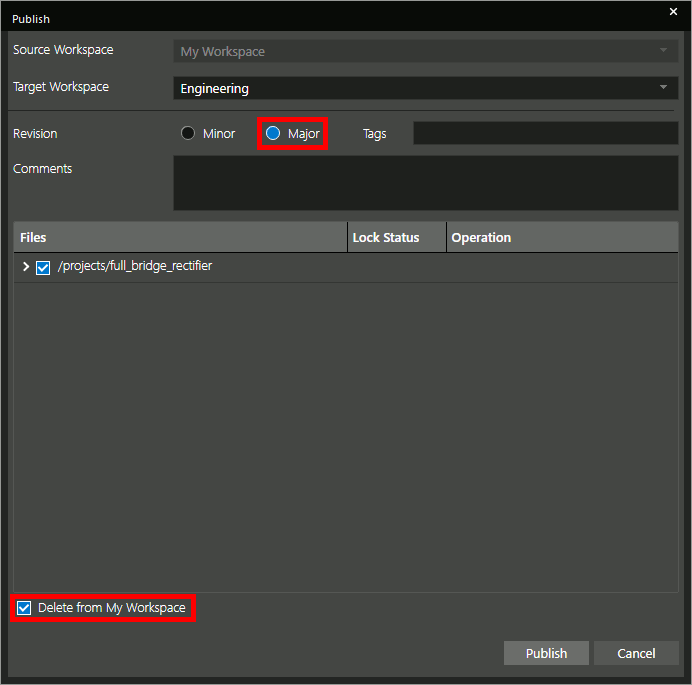
Step 31: The Publish window opens with the project checked automatically. Check Delete from My Workspace, set the revision to Major, and click Publish.
Step 32: A new Projects folder is created in the Engineering workspace. Select the folder.
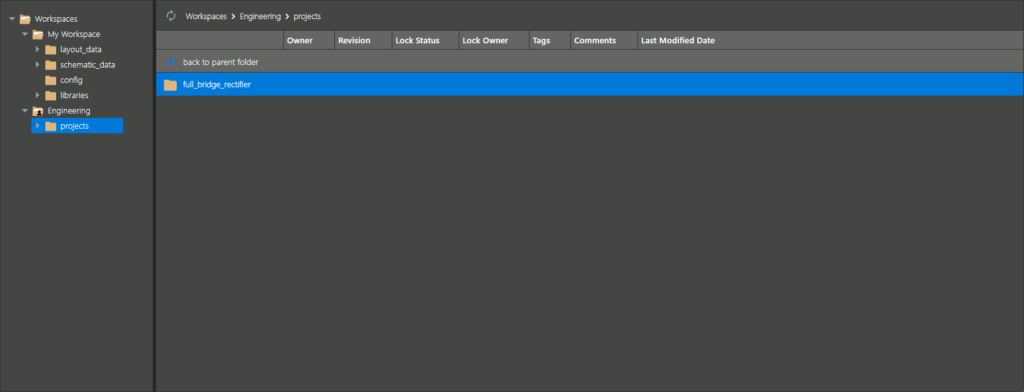
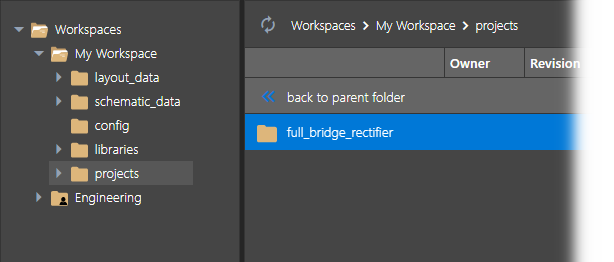
Step 33: View the contents. A folder for Full_Bridge_Rectifier has been uploaded to the cloud and can be accessed by anyone added to the workspace.
Step 34: Close the File Manager tab.
Editing a Cloud Project
Note: Any designer or admin in the workspace can edit a design project. If the workspace is available to the user, the project can be edited even if it is not on their local machine.
Step 35: Select the File Manager button from the toolbar to reopen the File Manager.
Step 36: Navigate to the Projects folder for the workspace. Right-click the project and select Edit.
Step 37: The Edit window opens with the project checked and the target workspace automatically selected. Click OK.
Step 38: Expand the My Workspaces folder and select Projects. The newly-checked-out project is listed.
Step 39: Double-click the project to view its contents. Double-click the .opj file to open the schematic in Capture.
Step 40: After modifying the design, select the DSN file in the Project Manager and select File > Save from the menu.
Step 41: Close the Project Manager.
Step 42: Back in the File Manager tab, navigate back to the Projects folder for your personal workspace.
Step 43: Right-click the project and select Publish. The Publish window opens.
Step 44: Check Delete from My Workspace and click Publish.
Step 45: Select the Projects folder for the shared workspace. The revision number of the project is incremented.
Note: For locally hosted team collaboration, additional user permissions, revision tracking, full file management, version comparison, and more, upgrade to OrCAD EDM.
Wrap Up & Next Steps
Use workspaces in OrCAD X Capture CIS to achieve seamless cloud-based team collaboration for libraries and designs and improve the PCB design process. Test out this feature and more with a free trial of OrCAD. Want to learn more about OrCAD X? Get access to free how-tos, courses, and walk-throughs at EMA Academy.

