With the schematic completed, the next step in the schematic design process is to generate a BOM or Bill of Material, the most important document for component purchasing and assembly. The bill of materials lists all components in the design, their manufacturer and part number, their supplier part number and additional purchasing requirements. Manually compiling the information required to create this document can be time-consuming and prone to human error. With OrCAD X Capture, automatically generate a BOM that is thorough and comprehensive to ensure the correct parts are ordered the first time.
This quick how-to will provide step-by-step instructions on how to generate a BOM in OrCAD X Capture.
To follow along, download the provided files above the table of contents.
How-To Video
 Open in New Window
Generate a BOM: Vendor Info
Step 1: Open the provided design in OrCAD X Capture.
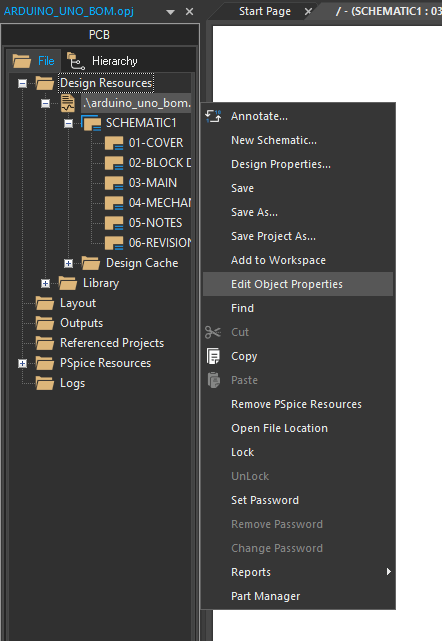
Step 2: Vendor names and part numbers should be added or verified before a bill of materials is created. For this example, the vendor info is already present. To learn how to assign vendor and component information, view our step-by-step walk-through. To verify, right-click SCHEMATIC1 in the Project Manager and select Edit Object Properties.
Step 3: The Property Editor tab opens, showing all properties for all components on the board. Scroll to the bottom of the table to view the Vendor and Vendor Part Number fields.

Step 4: View the fields. The vendor and part number fields are populated for each component. Hold Shift on the keyboard and scroll to the later parts.
Step 5: Close the Property Editor tab.
Create a BOM
Step 6: To create the BOM, select the .dsn design file from the Project Manager.
Step 7: Select Tools > Bill of Materials from the menu.
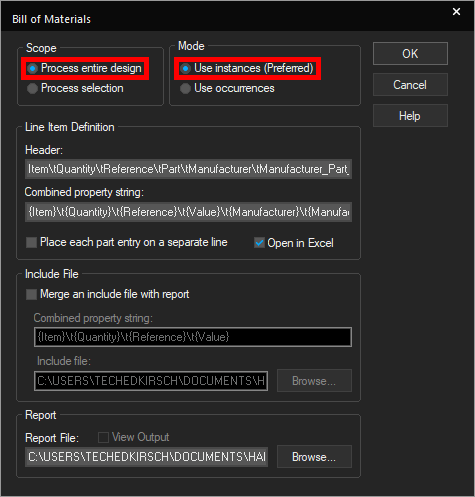
Step 8: The Bill of Materials window opens. Here you can configure the BOM scope, the mode, how line items are shown, and more.
Select Process Entire Design under Scope and Use Instances under Mode.
Note: This will generate a BOM of the entire design rather than a section. The Instances mode will create a BOM entry for each instance but not duplicates, e.g. if the design was hierarchical.
Generate a BOM: Define Fields
Step 9: In the Header field under Line Item Definition, enter the following expression:
Item\tQuantity\tReference\tPart\tPCB Footprint\tVendor\tVendor Part Number\tManufacturer\tManufacturer Part Number
Note: This will define the column headers in the BOM table.
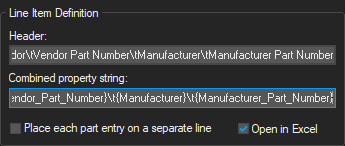
Step 10: In the Combined Property String field, enter the following expression:
{Item}\t{Quantity}\t{Reference}\t{Value}\t{PCB Footprint}\t{Vendor}\t{Vendor_Part_Number}\t{Manufacturer}\t{Manufacturer_Part_Number}
Note: This will determine the data printed in the table. The expression must be entered exactly as written here.
Always double-check with your assembly house for the required parameters to list in the BOM.
Learn how to streamline this process with OrCAD X here.
Step 11: Under Report, click Browse to browse for a location to save the file.
Step 12: Browse to the working directory. Enter Arduino_Uno_BOM for the name and click Open to set the location.
Generate a BOM
Step 13: Ensure the option for Open in Excel is checked and Place each Part Entry on a Separate Line is unchecked.
Step 14: Click OK to generate the BOM.
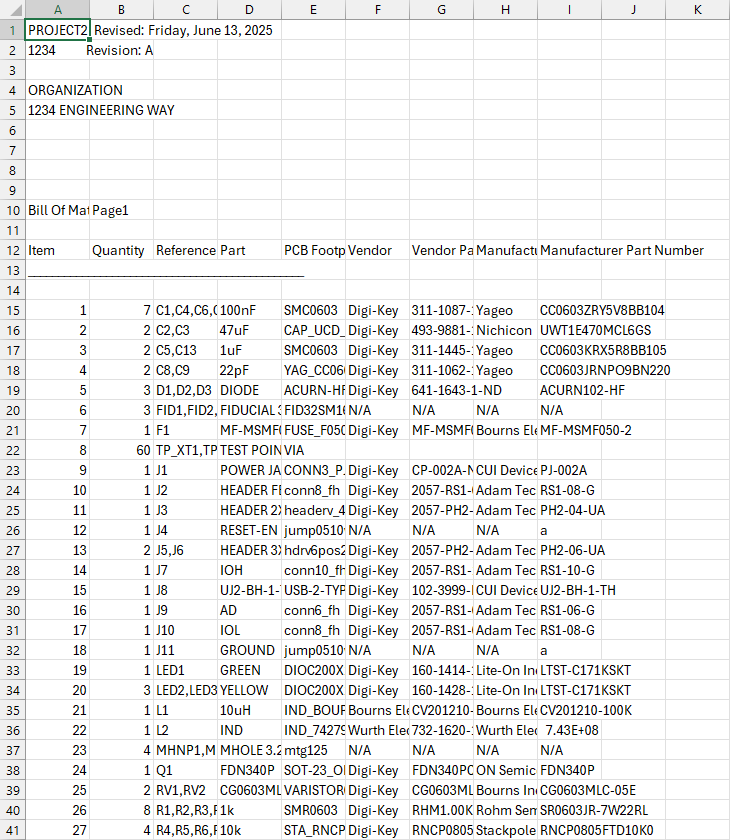
Step 15: Microsoft Excel automatically opens to show the BOM. Each unique part is listed with its DigiKey part number, its manufacturer, and its manufacturer part number.
Viewing the BOM in OrCAD X Capture
Step 16: Close Excel and return to the schematic canvas.
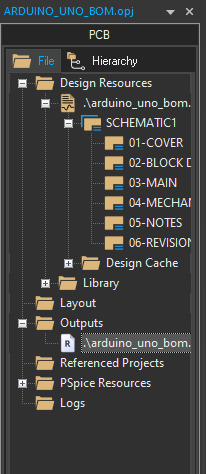
Step 17: Expand the Outputs folder in the Project Manager if it is collapsed. A new file, .\arduino_uno_bom.bom is listed. Double-click to open the file.

Step 18: The BOM opens in CSV form in Capture. View the BOM. The parts listed are the same.
Wrap Up & Next Steps
Quickly and easily generate a BOM to communicate the components required in the PCB and ensure your design is built with the correct parts with OrCAD X Capture. Test out this feature and more with a free trial of OrCAD X. Want to learn more about Capture? Get access to free how-tos, courses, and walk-throughs at EMA Academy.

